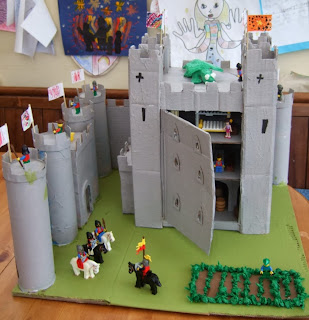
My previous post on cardboard box castles has proved very popular and now it's time for another one as the ginger one is learning about castles and had to go into school for a day dressed as a princess. Here's our latest castle. We got a bit carried away and it got bigger and bigger. Luckily we could still fit it through the door! We used the book "See Inside Castles" as our inspiration - even including a flap so we could "see inside".
This was how we started out, with boxes and Pringle tubes. My hot glue gun came in very handy to make sure it was all secure. We gave it a layer of papier mache with watered down PVA glue and tissue paper to add extra strength. It would be awful if it fell apart on the way to school! I didn't glue the castle onto the courtyard, which made it all easier to paint and to transport.
Then we painted it, inside and out with grey acrylic paint (and green for the courtyard). I cut out window frames which were painted separately and glued on when it was all dry.
Here it is completed. The ginger one used a black pen to draw on lots of arrow slits and we used a selection of Lego knights (from the castle set I had when I was little), which we glued on with Copydex so it could be easily peeled off later.
She wanted a dragon on the roof and so she used a packet of green Fimo Air light (with a little bit of white) to make her own dragon.
There was a garden in the castle picture in the book and here's our version with scrunched up green tissue.
In a recent school trip to a local castle they learnt how the knights would pour boiling wee onto their enemies. Here is our bucket of wee!
Luckily our pirate ship has lots of small plastic barrels we could use in the cellar
We used Lego to make chairs, tables , benches and a fireplace for the banqueting hall.
What castle would be complete without a princess and her 4 poster bed?


No comments:
Post a Comment